Click HERE too!

Showing posts with label DIY projects. Show all posts

Monday, May 12, 2014

Craft Along GR


   I have been quite chatty over on Instagram and Facebook, and have been just a little bit lazy over here! I apologize to those of you who don't have either of those and who like to check the blog...I will try to keep up with all of our events we have coming up!  


And we DO have some pretty exciting things happening over here at Everlasting Blooms! THIS WEEK, MAY 15 from 6 - 9pm will mark the First Ever Craft Along GR, we will be hosting the first one, and it will be upstairs in our cozy little barn! If you like to create and have fun with colors and fabrics then you won't want to miss this!


We will be joined along with the VERY creative
 Megan from Contented Sparrow
and the equally creative Jill from Cora Anne Designs!
They are both full of ideas! Filled to the brim with
all sorts of things that we can do with this Craft Along!
They will be helping teach everyone all the
 little tips and tricks to make our crafts perfect!
 
We will be making an adorable floral fabric covered button necklace
along with a painted paper succulent!
Oh and most importantly there will be
homemade PIE from Maisy's Pie Company!
 
 
You won't want to miss this! Please call the shop
and reserve your spot today!
(616) 285-9096
 
xoxo
Lynn & Kathi


Friday, November 15, 2013

DIY Christmas clay pot


For some reason this time of year
brings out the DIY in me, I see
something on pinterest, or a little bottle
of glitter and modge podge and my hands
can't wait to be creative.


I just can't help myself,
I walk around and around the
shop looking for inspiration,
I get a good idea, and have to be creative
that instant. I scramble for the
glue gun, I grab all the necessary
ingredients and get my hands moving.
 
 
 The beauty of
being creative is that you can
create something totally brand new,
something that has never been done
before. That is what I have done
here, hope you enjoy it!
 
 
This is what you will need for
my imaginative Christmas clay pot DIY:
 
- Modge Podge
-Glitter
-Clay pots
-Oasis foam
-Moss
-Glue gun
-Bits and bobbles
{I chose a broken ornament}


First thing you are going to want to do is
fill your clay pot with the Oasis foam, cut
the piece of foam and make sure it is level with the
top of the pot.


Once you have done that make sure you know what
bit or bobble you want to place on top,
I usually choose something with an
animal. A tower of small ornaments all glued
together would be cute too.
Get creative!
 
Take your glue gun and glue it right to the
oasis foam.


Now that my little deer is glued on, I'm
going to glue this green moss all around
the edge of the pot to cover the moss, and
sharp edges of my broken piece, and of course
because it looks pretty!


Once your moss is in place you are going
to brush modge podge all over the clay pot,
and if you want you can brush some on the moss and
whatever bobble you decide to glue in your clay pot.


Once you have brushed on the modge podge
you can sprinkle on the glitter, make sure you do it
in a box or somewhere you don't mind
making a mess.


The modge podge is just like glue,
after a little bit it will dry clear,
and all you will see is the pretty
glittery clay pot.


You can do all different sizes and shapes too!
The ideas are endless!
 
Happy Creating!
 
 
Until my next creative moment...
 
xoxo
Lynn & Kathi


Monday, May 13, 2013

Make your own Fairy Garden!


The popular gardening trend lately is 
fairy gardening, perfect for those 
little areas you're not quite sure what to 
do with, or if you have kids or grandkids 
this is a perfect project to do together!

I thought I would do a little DIY 
Fairy garden, if you love 
container gardening or don't have 
a ton of space for gardening 
listen up! 


The first thing you will need is a container, 
you can pick anything from an old wagon 
to a birdbath, or even an old suitcase!
Once you start scrounging around, 
the ideas are endless! 

Think twice before you throw out 
old "junk" it may become a new found
treasure. 


Next, you will need soil 
and an arbor or something to become 
the focal point of your fairy garden. 
It could be a little miniature house or 
anything!


and some little stones for a pathway


And last but not least you will need 
plants! We usually recommend using about 
4 to 5 plants per container, but it just depends 
on how big your space is. 


Now, once you have all you need, 
the first thing you are going to want to do is
fill your container with soil, I usually fill it to the 
top and pat it down so that when you water your plants 
in it won't sink down below the surface.


The next thing you are going to do is 
place your arbor or focal point 
where you want, we usually recommend 
putting it in the back corners of your space,
that way you are looking in to your 
fairy garden and you can place all of your 
little miniatures in the front where everyone will be 
able to see them. 


My arbor was a little too tall for my container, 
if this happens to you, just snip off the  
 ends of your arbor with a wire cutters, so that the 
bottom rim sits on top of the soil. 


Now for planting! 
I usually will plant my wire vine first, right by 
my arbor so that it climbs over it, make sure the you 
plant your ivy or vine nice and close! 


Next plant we recommend is 
Baby Tears! This is such a great plant for 
many reasons, we love it for fairy gardens 
because you can break it apart into small little 
pieces, it's great in the shade, outside or in a 
sun porch, and for winter you can bring it 
inside! We LOVE this one. 


Succulents are also great plants for fairy gardens! 
If you have plants around the house that have 
sprouted lots of little babies, all you have to do is 
cut a few babies off and poke them in the soil and 
they will root themselves! If you don't believe me, 
try it for yourself! 


When you are all done planting
don't forget to water in your fairy garden. 

Now go out and make one!

Start by looking for the perfect container, this is 
a great time of year for container hunting too, 
any garage sale you see, STOP and pull in
 you may just find your PERFECT fairy 
garden container. 


Happy Hunting! 

xoxo 
~ Lynn & Kathi 

Wednesday, October 10, 2012

DIY Fabric covered Pumpkin


It's that time of year again...
Crafty time! 

Since it's October, 
and since pumpkins are 
all over the place,
I thought to myself, 
what a great time of year 
to have a Pumpkin project! 


This is probably THE easiest DIY 
project I have ever done. It's SO easy! 
This is a perfect craft to do with your kids! 
There is NO glue or mess involved...
which means those hours and hours of cleaning 
up after your kids won't 
be happening... :)
{you can thank me later} 


All you need is a pumpkin,
your choice of fabric, a scissors, 
and ribbon or twine. 


Wrap the fabric around your pumpkin,
{preferably a pumpkin with a stem}
make sure it's pulled nice and tight 
around the stem and then 
tie your twine or ribbon around 
the stem..and that is literally 
ALL you need to do. 

I won't say I told you so...but 
it really is that easy. 


Oh so cute...


I hope you enjoyed! 

There are so many 
more crafty times to come.
until then...

xoxo 
Lynn & Kathi 

Monday, July 9, 2012

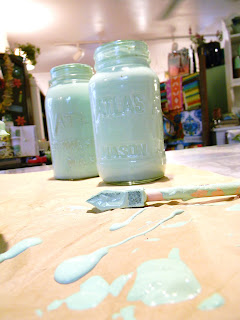
Painting Ball Jars: DIY


I have had SO much positive 
feedback from these 
Jadeite green jars I painted a 
few weeks ago! I saw 
this DIY on Pinterest
and HAD to give it a try! 

{image via Pinterest}


This DIY was SO easy and fun! 
Do you have lots of old vases laying 
around the house, that you hate and 
hide away under your cupboards? 
Why not paint them your favorite color, 
and display them? 


First ~ You are going to want to grab an 
old clear glass vase, or jar. 


Second: Pick out any color paint that you would like 
to use. I had some paint that we mixed 
ourselves a while back, any regular latex paint will do. 
Make sure you have either an old rag ready to use, or 
gloves..and lay down some newspaper...this 
could get messy. 


If you pour it nicely, it shouldn't get too messy,
but it's always good to be prepared!
Pour your paint directly into your vase or 
jar and swirl around til the whole thing is covered. 


It typically takes 2 to 3 days for the 
glass to dry...so be patient. 


Aren't they pretty? I love how they 
turned out! Just sitting displayed 
on your table or mantle would be 
simple and pretty. 


This Fall, in September and October 
we are going to be having some 
"Ladies Create" Events in our 
Greenhouse, where all the ladies come 
out and we create together! We were 
thinking of doing this as one of our crafts...
What do you think?? Or if you have 
any ideas we would love to hear them! 


xoxo 
Lynn & Kathi 


Tuesday, April 3, 2012

DIY fabric covered canvas


Let the beauty we LOVE be 
what we DO


 I am 
here today 
to Inspire you...
your task: to go out
and create something
beautiful.

Let me help...


You will need: 


Start by covering your canvas with
the fabric of your choice. 
(I used a thin flat canvas, 
and some lace fabric ) 

Make sure you leave some 
extra fabric  so you can 
wrap it around the edges 
of the canvas.


Next you are going to flip 
over your canvas and 
glue (make sure your glue is hot)
the edges of the fabric to the back 
of the canvas.


After the fabric is wrapped tightly
around the canvas, you can 
measure out your ribbon
to the length you want,
and glue to the back of the 
canvas, make sure the 
ribbon is over the fabric.


Once that is done, you can 
cut a piece of paper of your choice
to place on the back of the 
canvas. 


Now let the fun begin!  :)


I mixed and matched my buttons,
but you can do whatever you want!
That's the beauty of creating 
you can make it your own, and 
put your personality into it. 


Now comes the tricky part, 
at least for me it was...
what to put in the 
center? hmmm..

I chose some vintage 
inspired postcards of 
Paris we had in the shop.

If you wedge the edges 
of either your photo or whatever you 
choose to put on your canvas, 
underneath the buttons 
you won't have to glue them, 
AND you will then have the 
option of switching out the 
photos! 


Now get going...and 
create something beautiful! 

Until next time...
We hoped you enjoyed! 

xoxo 
Lynn & Kathi 

Search This Blog